.
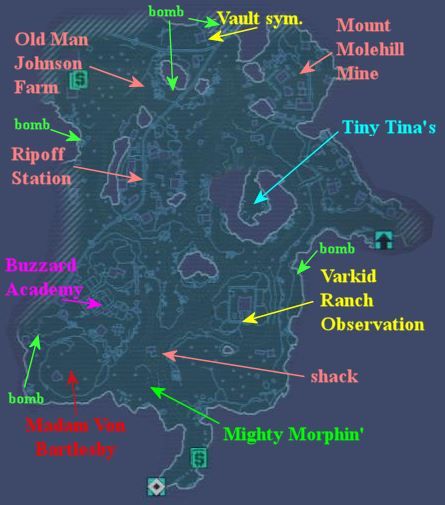
Arms Dealing: This is a timed mission. Before starting it, make a dry run where you go to each of the mail boxes shown on the map. Be sure to kill all the critters and robots at each location so they don't slow you down.
You are told to go to the first mail box, which is next to the C-A-R in Outlook, in order to start the mission; however, the timer does not start if you don't do the second step of taking the arm out. So save that for last since you have to come back to Overlook to finish it anyway. Instead, drive to the most distant mail box before starting the timer and work back towards Overlook:
- Drive to the beach area next to the bridge to Opportunity. Go to the building to the right at the end of a pier, go up the ladder, and (1) open the mail box and (2) take the arm. Don't forget to do both steps.
- Come back up to the road, turn right and go a short distance then drive over a cliff on the left to the building with the mailbox in front.
- Drive back up to the tower where you previously shot the fuse. Go to the mailbox up the stairs.
- Drive back down towards the road but go up the road towards AgAc. Turn right to go towards the water wheel. Park at the building on the left with an electric barrel up front. Jump on the barrel and onto the roof. If you have a robot or turret, deploy it on the roof. Jump down to the mail box in the back. Open it, get the arm, use the boxes to get back over the roof.
If the barrel isn't there or if you get knocked down into the lower area, you can climb back up at the back right of the shack. If this is your dry run and you have a good weapon, you can jump down into the lower area and kill all the varkids, but doing so isn't essential. On the real run, you can get over the shack and back without too much trouble.
- Drive back to Overlook and get the arm you left in the mail box, then run to the mission board and deposit the arms in a tiny mailbox next to the gun machine.
Return to top.
Torture Chairs:
You just walk around Sanctuary and pick up some echos. The only tricky thing is that the HUD marker for the echo in Zed's looked to me like it had an up arrow in it which would indicate it's on the roof, but it's in the back left room in Zed's.
etti
This is a long mission with only one set of vending machines about half way through (in addition to those at the start). So while picking up all loot is generally a good policy, here you may want to leave anything under $300.
Missions: Wildlife Preservation (story mission) and 10 Slag samples) and Doctor's Orders (4 Slag Notes). See the Legendary Weapons page before doing these missions if you intend to farm the Legendary Loot Box Midgets.
Challenges: Siren's Song (4 echos), Vault Symbols (2), Bear Minimum (5), Secret Stashes (3), and Ride Together Die Together.
10 Slag samples are pretty easy to find, so they are not mentioned below. The first 6 are shown on the map, and the last 4 are in the last couple of rooms near the end, so they aren't even shown on the map. If you are farming the Loot Box Midgets before continuing the mission, you will pass a couple of slag samples each time you make a farming run. They respawn and you can get all 10 if you do at least 5 farming runs.
When entering the first area, look for a stone bridge/ramp to the right and follow its path up the mountain, stopping to kill rakks on the way. (If you farm later, run to this ramp and jump down to the river to get out of the varkids' area.)
After meeting Mordecai, he will start sniping at stalkers below. You can join in the fun if you want, although you don't really gain anything by doing so. Just bonding with Mordecai, you know.
Echo 1: Start back down the path but jump off at the lighthouse. An echo is on its steps.
Bear 1: Continue down to the short bridge but turn left instead of crossing it and go to the first goo hanging down with a bear in it.
Fuse box: Head back to the robot killing area, go through the gate and note a room on the left with an electric barrier under an Hyperion sign. You can't shoot the fuse box, so instead shoot the fire barrel on the top roof above the room.
Symbol 1: Watch the claw crane come down on your right where it will pick up a box. Stand at the right end of where it says "Hyperion" and hop on the claw when it starts up. Ride it over to the roof of a building and jump off before it goes down. A vault symbol is on a wall on the roof.
Up the stairs is a sunken area with skags. Before going down there, if you want to get the Naughty Bear (Easter egg), see the video (click on the name above).
Go to the far right of the lower area and fight your way to the entry to a much larger outdoor area.
Stash 1: As you enter the larger area, bear right towards the overpass until you come to the entry to a stash on your right. After looting it, come out and turn left and continue on. When you get to the far area which has the door to the next area, go up towards the door but turn and go up the ramp-like rocks to the overpass.
Alternative approaches:
- Turn right coming out of the stash and go until you can use the stones to get up to the overpass. Kill rakks. Continue down the overpass until you get past the hills up against the overpass on the left. Don't worry about Tumbaa and Pimon yet; you can get them later.
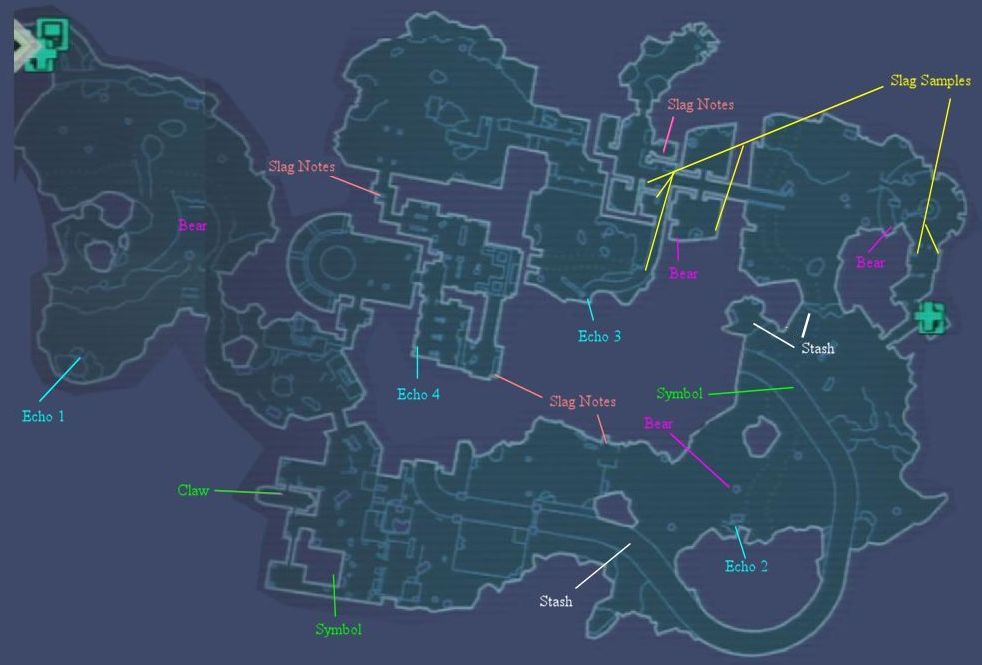
Symbol 2: However you got to the overpass, you now keep going and find a vault symbol on the road.
Stash 2: Go to the end where there is a giant mushroom looking thing with claws sticking out.
Jump onto a mushroom claw, cross the mushroom, then jump over to the center edge of an area on the same level with the top of the mushroom thing. Stash #2 is in the back..
Stash 3: Jump down to the ground, turn around to the left and go under the waterfall to the final stash.
Bear 2: Go back to the big open area and circle around to the left towards the observation tower.
Just short of the tower is a giant mushroom with a bear in its goo hanging down.
Echo 2: Continue to the steps of the tower to find an echo.
Finish looting the area and come back to the door to the next area. Sell excess gear at the vending machines, ammo up, loot boxes, and go into the round area to fight stalkers, then into the next outdoor area to fight robots and a few more stalkers.
Just to the right of the vending machine is a door to the Creature Slaughter Dome DLC. If you don't have the DLC, it is well worth the $5 Microsoft currently charges for it on XBox Live. The reason why is that without it, you must start each farming run by going from the start of the WEP entry to the current building. With the DLC, each time you Save-Quit-Continue, you will spawn outside the door to the DLC, saving a lot of time and aggravation.
You can also go out the door you just came in (the building's door, not the DLC's) to hunt or farm Tumbaa and Pimon. You complete a challenge if you kill them within 10 seconds of each other. They don't always appear, but when they do, they'll be within eyesight of the door.
Bear 3: Go through this building and outside the far door, turn left and get up on the concrete walkway around the building you just exited. Go along the walkway next to the windows until you reach the goo with the bear.
You cannot enter the next building until you defeat an army of bots and stalkers. When done, enter the building, go down the hall, turn right, and the Loot Box Midget boxes are in a room on the right. The Loot Box Midgets in the four cardboard boxes sometimes drop legendaries. See the Legendary Weapons page before continuing beyond this room.
Bear 4: When you are ready to exit to the stalker area, first go to the right corner of the area to the left of the exit for another goo-bear.
Echo 3: Go to the room on the right of the exit to collect a sample, a note, and loot, then go out the door and to the end of the walkway to an echo.
Bear 5: After you drop down into the stalker area, follow the creek all the way to the end to pick up a sample unless you got 10 already while farming. As you approach the next door, turn left and go to the mushroom with the last goo-bear.
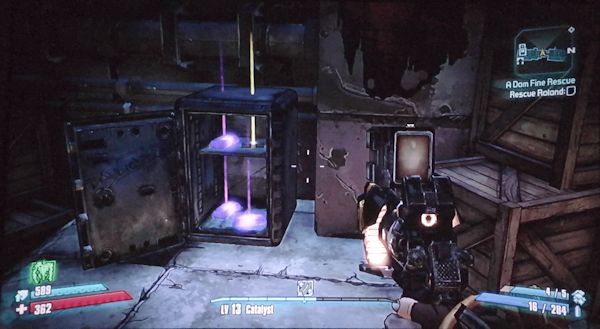
Go through the door, across a small area to stairs, up the stairs to another area with rakks, skags, and finally some troops. Go inside. Push the button behind the receptionist. Open the safe to find a note for the Doctor's Orders mission, though you should NOT pick up these items if want to continue farming the Loot Box Midgets.
After clearing the next area, go to the storage containers on the left wall (as you entered) and pull the switch to open them. A note is in the last container.
Echo 4: Against the opposite wall is a chair with the last echo.
Take the elevator down to the arena and kill Bloodwing. You can either run back to the start of the WEP or Save-Quit-Continue to rematerialize there, unless you used the DLC in which case that is where you will rematerialize.
You can come back later and the Son of Mothrakk will have taken Bloodwing's place. Kill it for a chance at getting the Chikamin Skullmasher sniper rifle.
Back to Sanctuary
The usual: Get new gear from your armory, sell junk gear, play the slots, buy backpack upgrades.
Turn in missions. Pick up new missions: Rakkaholics, Animal Rights, Poetic Justice, Once and Future Slab.
Rakkaholics Annonymous:
Go to The Dust. Straightforward mission.
Animal Rights:
Go to Wildlife Exploitation. Again, nothing tricky about the mission, but you may want to farm the loot box midgets again as well as killing and farming Son of Mothrakk.
Return to top.
Leveling up at Opportunity:
The leveling up bar has 10 divisions. At this point I'm just over 23.8 and have a lot of level 24 gear waiting, so I'm going to take a detour to Opportunity to quickly level up. I also came here at level 19 and usually level up a time or two when I first get missions here, as well as a later visit any time I need a quick level up.
Fast travel to Highlands - Hyperion Bridge. Get any car from the C-A-R on your left, turn right, go to the bridge and enter Opportunity.
Weapons: This job can be done with nothing more than a good launcher. At level 23 I have one with damage of 8148 with a 3-rocket clip. Also equipped are a launcher damage relic and/or a mod to improve weapon reload time.
Upon entering Opportunity, go left and stay left past a couple of barricades until you reach some shipping containers. (The "Level up" area on the map further down.) The round pad sticking out is where a constructor will land. Turn right at the shipping containers and look around for robots.
You may not want to use your skill on these guys in case it doesn't recharge in time for the constructor.
After killing them, you have about a minute before the constructor lands. I've upgraded my backpack to carry 30 rockets. You may need about 10 more rockets to destroy both the constructor (takes 3 shots from the 8148-damage launcher with a robot helping) and more robots. If you don't have enough, you can run like heck back to the vending machine to restock or use other weapons for the robots.
I wait for the constructor between the first shipping container and the edge of the water to provide cover from the upcoming robots. A rumbling starts before the constructor lands. When you hear that, deploy your robot or turret.The constructor bounces before setting down. I wait to avoid missing with a rocket.
Three rockets plus the robot's help destroy it. After finishing off the Hyperion robots and picking up loot, I am now at level 23.9 and need one more constructor kill, so I Save-Quit-Continue.
Since I haven't received a mission in Opportunity yet, its fast travel station didn't activate when I came in (which is unusual since other areas fast travel stations will activate before getting their missions). So I materialize at the Highland - Hyperion Bridge station and must cross the bridge again, but first sell gear and restock ammo.
A repeat of the above gets the level up plus 6 bars of eridium - 2 the first time and 4 the next. Average is around 1-2 bars per kill. There's also a red weapons chest and a lot of ammo and cash boxes
To show what a good weapon the level 19 Caustic Infinity pistol is, just for fun I equipped it along with a +24% elemental damage mod and a +10% pistol damage increase relic and stood a couple of feet in front of the Constructor when it landed, deployed my robot, and after the constructor dropped its reflector shield, shot it in the eye until dead - with a pistol.
Missions: Poetic Justice, Once and Future Slab (main mission), Shoot This Man In The Face.
Challenges: Vault symbols (2), Portrait of the Gunzerker (echos), Grave Matter, Slab UHF.
Weapons used: fire sniper for bandits, pistol/rifle for buzzards and close fighting, launcher for the slab battle.
Words cannot describe Slab UHF. Watch the video.
Echo 1: Enter the first fighting area. To the right is a vending machine with an echo to its right. All the buildings in Thousand Cuts have a lot of loot containers, so they will not be pointed out individually.
Graves 1-2: Go to the next group of buildings and take the bridge to the left to an island with 2 graves and photo op for Scooter's mission.
To the right of that bridge is a platform and stairs down to an area to loot. Across from that is a shed with a nudie magazine for Scooter. This is all of that mission for this trip.
Echo 2: When you get to the bridge/shipping-container to the next area, look right to see a shed which has an echo. Cross the bridge, turn right, go up stairs and around to jump to get to the shed and then jump back.
Echo 3: Keep going until you reach a large metal bridge with some sections removed so that you can go underneath it to get an echo. At the end of the bridge, turn right, and go to the platform at the end. Below is a ledge that has a weapons chest and a ladder back up.
Shoot This Man In The Face: Cross over the end of the bridge and circle the rocks to find Face McShooty.
Fuse box: When done with McShooty, bear left to a path to a tower. Circle right around the tower and send the elevator up without you. Either drop down in the hole or walk around it and shoot the fuse box.
Echo 4: Get the elevator back down and ride it up. Keep circling around until you find the echo. You can jump down to the path from here.
Grave 3: Keep bearing left at the end of the path back to find a grave.
Graves: Keep on bearing left until you reach a graveyard with the rest of the tombstones.
Vault Symbol 1: Go to the far left corner of the building and circle around to find a symbol on the building.
Go inside the building for the slab initiation. When done, come out and fight the robots. When that's over, you'll be close to the bridge in the first area you entered. (You can sell gear now if you need to.) Cross the bridge and take a picture for Scooter.
Symbol 2: In the distance past a bomb crater is the last picture site. After you take that, turn left and go to the right of the bombed-out buildings. Get on the roof of the right one, hop onto a post, then onto the front of the next one. Turn right and a symbol is on the wall.
Back to Sanctuary
Turn in mission to Scooter. Report to Roland.
New missions: Rocko's Modern Strife (L20), Man Who Would Be Jack (L22), Home Movies (L21), Hell Hath No Fury (L22), The Bane (L24)
Rocko's Modern Strife:
Return to Thousand Cuts to perform this mission. No new challenges nor side missions. There are some videos of people running around searching all the loot containers in Thousand Cuts for Loot Box Midgets, but there doesn't seem to be much return for the time and effort compared to Wildlife Exploration Preserve.
You have to get onto a turret to kill Hyperion robots as they come towards you, but eventually they start spawning behind you, so leave the turret when to bots start getting into that area and go back to kill them.
Return to top.
Missions: Statuesque, Man Who Would Be Jack (L22), Home Movies (L21), Hell Hath No Fury (L22).
Challenges: Echos, Cameras, Vault Symbols, Shame the Foreman.
Weapons: Whatever you need for fighting constructors, robots of all kinds and engineers.
The Top o' the World challenge is not covered here because it requires a co-op partner.
Upon entering Opportunity, go to the mission board on the right and get the Statuesque mission. See the section above about leveling up in Opportunity. If you want to level up some more, just repeat those steps with the following exceptions:
- Every time you restart, get the mission assignment again. This unlocks a loot area for you.
Do not interact with the constructor in the unlocked area until you are ready to start the mission.
- When you S-Q-C, you will come back in Opportunity instead of Highlands as you did before.
- You may see enemies in the first area next to the fast travel machine but you can run right by them to get to the Constructor area.
When ready to continue, go into the trailer and pick up the supply beacon for the Home Movies mission. Then interact with the constructor in the unlocked area and complete the mission, then come back to the starting area for the rest of this walkthrough.
Man Who Would Be Jack: This mission overlaps with many of the challenges so make it the current mission.
The most difficult challenge is finding the cameras because they are small and hard to spot, there's so many of them (8) and they could be anywhere and some of them may have already been destroyed during earlier fighting.
Hopefully, the following walkthrough and map will get you to them. Here is the best video I could find, but it is not in the same order as the following nor does it take into account other nearby challenges or missions to do at the same time.
Echo 1 is next to the ammo machine (top of the following map).
Camera 1: From this point you can find a camera on the left side of the building ahead. If you did the Statuesque mission, some of the cameras may have already been destroyed in which case you may see a smoking black spot instead of the camera.
Camera 2: Go up the stairs in the direction you just shot and keep going to the end of the building and turn right. You should see a turret gun on the side of the building in front of you. Destroy it and look to its left to the corner of the same building for camera 2.
Go up one of the sloped supports and at the top, turn left and go to the roof to where the beacons are.

Camera 3: Go off the roof under the lit sign on the far side and go down the stairs in front of you until you come to a pool with a rail around it.
Look at the H sign to your right and shoot the camera to its left.
Symbol 1: Jump over the rail into the pool and go under the right section of the walkway to find the symbol. If it is too dark to see what's on the underside of the walkway, just keep looking up and moving around until you see the prompt.
Echo 2: Jack's double is in the area of kiosk k0. Kill him. An echo is on a bench behind the kiosk marked on your HUD.
Camera 4: Look past the kiosk to find a camera on the corner of the far wall. If you have trouble spotting it, compare your HUD map to the map above and put a marker on the HUD map in the same spot. Don't forget to unmark it when you are done.
Go around the kiosk to use it. Turn around and go up the stairs on the left and keep bearing left until you reach a grassy area overlooking kiosk 1. (See the map above).
Cameras 5 & 6: Go as far as you can to the end of the grass and look left and above the Jack poster to where Camera 5 is sticking off the corner of a building.
Rotate right and look across (right and above the lit rotating "H") for camera 6 on the wall at the back of the walk way.
Echo 3: After you go to the kiosk below, get the echo by the vending machines at the bottom left edge of the map.
Camera 7: Go northwest from the machine (towards the big pier) to the first stairs on the right. Go up those stairs and the next stairs to see a camera on a post in front of you.
On the other side of the post are stairs going down. Put a map marker on your HUD map because this is where you have to come back to get to the underground room at the end of the Man Who Would Be Jack mission, then continue to kiosk 2 on the map and then go to kiosk 3.
After you have done the last kiosk, which is near where you entered Opportunity, switch to the Home Movies mission. The three posters of Jack are in the same area. After placing the lures on them, you should be ready to place the orbital beacon that you picked up from the trailer next to where you got the disabled constructor for the Statuesque mission.
The easiest way to get to it is go past the entry area (where the fast travel machine is) to its right and follow the edge around until you reach the pier. There is a big shipping container at the end with a weapons chest in it.
Follow the HUD marker you placed earlier to find the underground room where you finish the Home Movies mission. It is near the room where you finish the Man Who Would Be Jack mission, so you can finish them both on the same trip.
Camera 8: After you finish that mission you will still have a side mission marker ("!") on your HUD map. When you go to that point you can look over to see camera 8 between two doors, though it may have already been destroyed. Check the Challenges list to make sure you have finished the challenge.
Symbol 2: When you go to kill the foreman you will be close to the 2nd vault symbol. Go to the point shown on the map. Go down the stairs. Circle around until you can go under a platform. Go under a couple of steps, turn around and see the vault symbol.
Shame The Foreman: Use a launcher and kill him quick, then follow your HUD to his shed. After killing a constructor, cross to the other side of where it was and go to the elevator to the fuse box shown on the map above. As soon as you push the button to go down, start walking off the elevator in order to get off on the next floor where the fuse box is.
Drop down the elevator shaft and go back up to the top. Cross back towards the foreman's shed until you spot a structure with a Hyperion sign on it. Go down the short staircase to the left of that structure then drop down onto the balcony below to get to the loot room that was protected by the electric field.
When done looting, finish the mission.
Foreman Jasper can drop a legendary shield, Black Hole. You have to S-Q-C before you can farm him.
Return to top.
You get this mission in Sanctuary from a guy on the ground to the left of the side entry to Moxxi's. Next you have to visit Marcus and then go to The Dust and follow map markers which take you to a guy named McNally to get his ECHO.
McNally randomly drops a legendary SMG called Hammer Buster. McNally is ideal for farming the Hammer Buster by doing a Save-Quit-Continue without picking up McNally's echo. (You can pick up his other loot, however.)
- He is fairly close to Ellie's where you come back when you Contniue
- As you walk from the Fast Travel to the CAR machine, you can check the spawn point for Gwen's Head.
- As you drive from Ellie's to McNally's (he's to the right of the racetrack), you can check the second spawn point for Gwen's Head.
Unfortunately, this is a rare combination of a not particularly great unique weapon (Gwen's Head), a below average legendary weapon (Hammer Buster - I never use it), and a completely worthless mission weapon (Bane)
After you get McNally's echo, you have to go to Lynchwood to finish the mission which you can do while working on other missions. Still not worth it.
Hyperion Contract
This is simply a mission to kill a bunch of random bandits. If you don't already have it, go to Highland - Overlook and get it from the mission board. You will be killing a ton of bandits in the upcoming Lynchwood missions.
The Hyperion Contract requires you to kill 100 bandits. Extra XP sub-missions require you to kill 25 bandits using different types of attacks/elements. This is fairly hard to do. If you kill even 1 extra bandit with one type of attack/element, you won't be able to complete all the sub-missions, so watch your counts carefully, but even then you or Deathtrap may kill 1 the wrong way and the mission fails.
Missions: The Bane, 3:10 To Kaboom, Animal Rescue, Breaking the Bank, Showdown.
Challenges: Vault Symbols (2), That's Impossible, Do Or Die (4 echos), Last Train, Look Ma.
Duel of Death challenge is not covered here because it requires co-op play.
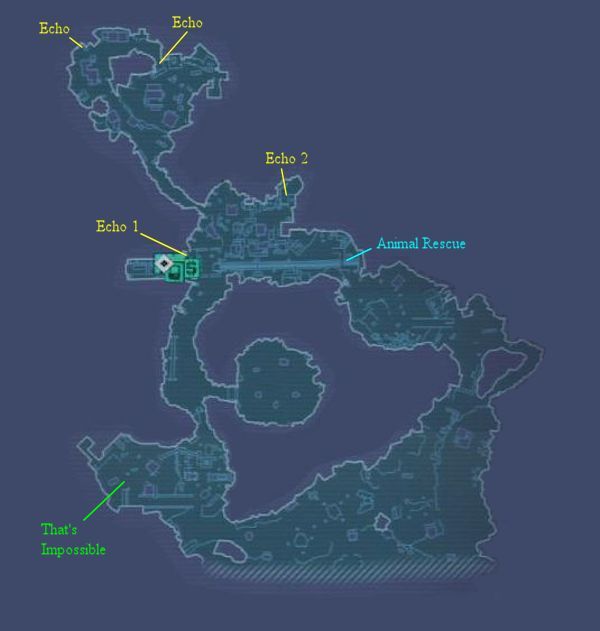
Echo 1: Exit the station door and look in the dumpster to the left.
Breaking The Bank: Follow your HUD map to the bank and examine it. Go up the nearby stairs and pick up the laxative marked on the HUD map. Don't miss this or later you will have to make a long trek back to get it.
Echo 2: Continue up towards Echo 2 until you get to a building with multiple stairs. Go up them and look around for the Echo.
Animal Rescue: To start this mission, go to the ! marker on your HUD. For the first mission, go back down the tracks to the first set of stairs on the right. Go up the stairs to the top of the building. Jump to the next building and pick up the medicine.
Symbol 1: Jump up on the box the medicine was on, jump onto the left side of the roof. Turn right and go until you reach the vault symbol on the roof of the last building section.
Go back and do the next part of Animal Rescue.
Go back to the station. Sell stuff and buy ammo. Exit the station and go right. Continue until you reach the elevator.
Switch back to Breaking The Bank. Fight your way to the stairs going up to the right, but keep clear of the green glowing switch on the right because if you simply get too close, the timer will start. Up the stairs, continue to kill rat-boys until you get the bank mission objective. Go back down to the next lower level. Switch to...
3:10 To Kaboom: Following the previous paragraph, you should have killed all the bandits on both levels, which makes this mission very easy.
Go to the switch which is now to your left. Flip it and run across to the switch on the other side and flip it to close the door and stop the car carrying the bomb. Grab the bomb, RUN the rest of the way - first to the rail car and then up stairs to the detonator switch.
When you get to the detonator, don't push it until the train stops and the cart with the bomb gets below it. If anything went wrong and you failed the mission, you have to go back to the mission board at the station and get it again.
The stairs you went up to the detonator is where Mad Dog will come down later when you are farming him.
That's Impossible: The tower shooting out flame is where you have to throw the grenade. It has four light around it and it flames out after the fourth one. You have to time it so that the grenade hits after it opens and before the flame comes out. A Longbow grenade makes it easy.
Look Ma, No Hands: Switch back to the bank mission and go to the next point. You will come across some rat guys riding giant skags. Try to kill the riders without killing the skags, but the skags are very dangerous so feel free to use a launcher on them once the rider is down. You may not get the 5 riders needed here but more will come on a later mission.
Do the laxative-bomb part of the bank mission and Save-Quit-Continue back to the station. Sell junk. Buy ammo. Do the bank. Follow your HUD map to escape and to bury the loot. Push your button once to set the loot down and a second time to actually bury it. Save-Quit-Continue to get back to the station to turn in the mission, sell junk, buy ammo, and pick up the Showdown mission.
Switch back to Animal Rescue and head towards the food locations which are in the same area as the Showdown mission.
Fuse box: After you get to the first food item, take the first clear area to the left to a shed with the fuse box. The protected area is a car trunk loot container up on the next area. For now, keep picking up food for the skag. In a bit you'll get into the Showdown mission. When that's done, get back to picking up food.
Echo 3: When you get to the building with a big star on top, turn left between the buildings and look behind the round thing for an echo.
Echo 4: Keep going to a cavern with a vending machine inside. Across from it is a rusted out minivan with an echo inside. You will also see the last food item nearby.
The Bane & Look Ma: Now you can switch to the Bane mission. While you are finishing that up, you can get the rest of the skag riders you need. First, take the elevator up.
Symbol 2: Look for the car trunk loot container. Climb it up to the roof and look down between the blue roof and the green roof.
Switch back to Animal Rescue. Give the food to Dukino. He needs more food - 5 skag tongues. Go up the stairs near him and shoot some more giant skags with riders and pick up the tongues. Give the tongues to Dukino and then you have to follow him to a shelter. Once you help clear that area, the mission is finally over (for now).
Last Train: Saving the hardest challenge for last. The 5:00 train (more or less) has a bandit on the back that you have to kill. The train moves fast so you only get 1 or 2 shots at most. Launchers and homing grenades seem to be too slow. That leaves a very powerful sniper rifle. A mod that increases its damage and an amp shield would be helpful. If you can't get it now, you will be coming back here later if you do the Demon Hunter mission.
Go back to Sanctuary. Take care of the usual business and meet with Claptrap to start the next mission. (All other missions should be completed by now.)
Return to top.
When Claptrap gets you in, you can only go so far before you are stopped by a barricade where a turret pops up to your left. Once you blast that and the barricade is down, I used to stay back and destroy all the bots before advancing, but if you just go on up as far as you can go straight, you can destroy a constructor that comes out there, then you don't have to deal with all the robots it creates.
When you run down the road to the next area, stay to the right so that a blast doesn't knock you over the edge. Soon you get to the gate and some troops and bots will come out. Once they are down, it again pays to be aggressive and run around to the right and go up the stairs to the next level.
Another constructor will land on the level above that and you can blast it with a launcher and keep working your way up to the stairs to the entry to the Bunker.
Alternatively, you can stand just outside the gate and snipe at the constructor from there.
Keep going until you go through a portal door to the Bunker area and destroy all the big guns.
After BNK3R comes out, the safest place to go is back down towards the vending machines, but stop in front of the Hyperion sign where you go in after the battle is over. I used to go to the top back area which was recommended in videos but found this lower area to be greatly superior. For one thing, you'll get only 1 or 2 bots down there and the Bunker can't hit you at all while you can shoot it with whatever you want when he camps out over one end or the other of that area.
Another benefit of being in that area is that when you run out of ammo, the machines are right there.
If your weapons and shields are advanced enough, you can go up to the open level and it is easier to shoot him.
Bunker can be farmed for The Sham bullet-absorbing shield and The Bitch submachine gun (both legendaries).
Challenges:
Vault Symbol: It is along the ring under the left side of the waterfall. You can get to it by jumping at that point into the big leaves next to a couple of vertical pipes.
Bunker Buster: Destroy BNK3R without destroying its auto-cannons.
The rest of the mission is pretty straightforward. It involves going down to where the Siren is being held and "freeing" her.
Back to Sanctuary
Turn in the mission. Pick up Bearer Of Bad News.
Get other missions while meeting people.
- Demon Hunter - mission board.
- Chosen One - Marcus
- Monster Mash 1 - Zed
- Truxican Standoff - outside Scooter's; finish it when you get it.
- Capture The Flags - Brick
- Open Roland's Armory - finish it when you get it.
- Toil & Trouble - main story mission.
After turning in the mission, you can go back to farm BNK3R.
Hyperion Contract is probably still open.
Back to Lynchwood. Do the mission. You can farm Dukino's Mom for the legendary Mongol launcher.
New Missions: Customer Service, To Grandmother's House, Kill Yourself, A Real Boy, Hyperion Slaughter.
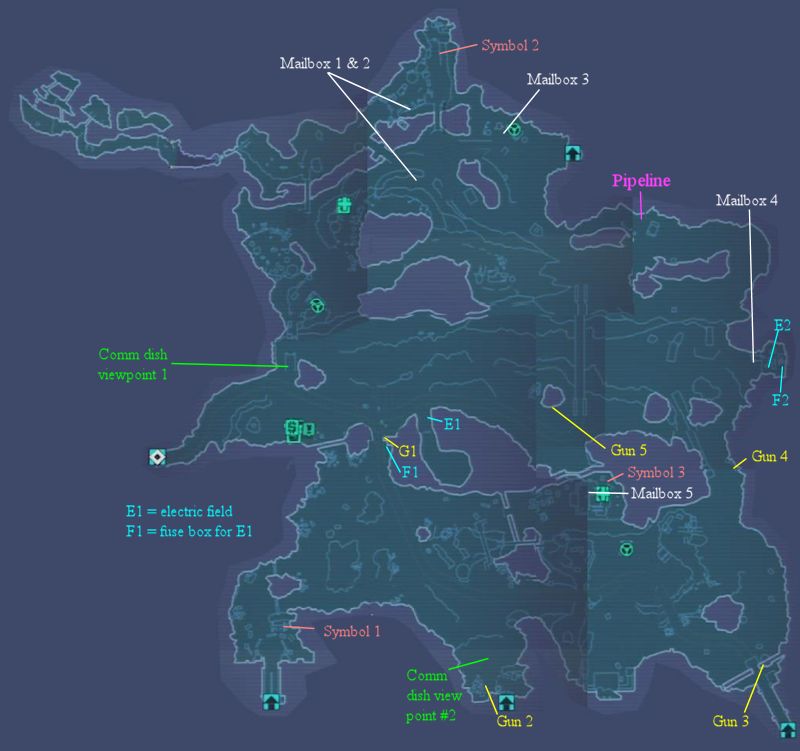
Challenges: Pipe Dreaming, Can You Hear Me Now (4 comms), 'Twas Slag, Vault Symbols (3), Tie Clip, Save The Turrets, Bring Out The Big Guns (5 turrets), Vault Hunter vs. The Volcano.
Comm 1 & 2: After picking up the new missions at the Eridium Blight mission board, drive across the street onto the broken bridge. Get out and look ahead to see a comm dish to shoot. Turn around and see a second one in the distance.
Turret 1: Drive over to the gate on the right side of the road and destroy the turret gun (marked G1)
Go through the gate. Kill rakks (Monster Mash 2) and bullymongs.
'Twas Slag: This challenge involves King Mong. You may see him on the rocks to your right when you go through the gate (G1 on the map). If he's not there, he is often to the left of the bridge/portal by "Gun 2" at the bottom of the map. Or he may not spawn at all.
Weaken King Mong with turret shots then get out and finish him with a slag weapon. He sometimes drops the legendary Badaboom launcher.
Tie Clip: The challenge is to get close enough to Donkey Mong to get the prompt to clip his tie without getting hit by a barrel. He is harder to find than King Mong. See the Strategy section on this page for help.
Symbol 1: Take the first path to the right after the gate and follow it up to the second entrance. Turn left and go towards the big gates. Take the first left and the symbol is on the other side of the left building.
Fuse box 1: Go back to the road by the gate. Near the top on this side is a fuse box. It controls an area down and to the right of the road just past where you turned to go through the gate to this area. You can get that area later if you wish. It's full of really nasty beasts. Killing them is not part of any mission or challenge.
Go on down the road on this side of the gate to where it curves left and a path goes to the right and splits. The upper path leads to the Real Boy and Hyperion Slaughter missions. Pick up the Real Boy mission and then go inside.
Hyperion Slaughter:
If your level is high enough, do the Hyperion Slaughter first. The first four rounds will be leveled up to your starting level. That is, if you are level 28.9 and sign up for Round 1, each of the first four rounds will be at level 28 even after you go to level 29.
The last round will be at least one level higher and may be more. So if you started at level 27, the final round is usually level 30. You will have to leave and come back when you have reached level 30 in order to do the last round because you cannot get from 27 to 30 doing rounds 1-4. When I started at 28.9 and rounds 1-4 were level 28, round 5 was 29 even though I was at level 30, and some videos show players at level 32, so it's not clear how the level for round 5 is set.
The first couple of rounds are pretty easy. You can just run up to where the bots come out and start shooting. If you die, it's easy to come back with Fight For Your Life. On later rounds you need to get to some place where you can recover and hide from rocket fire. When you first enter and go to the circle in the middle, keep running straight to the yellow platform and get in the shipping container on the edge. This is a pretty good home base from which you can deploy your turret or robot and/or regain shields and health. You can't be attacked from behind and seldom does anything come up to the front of the container.
If you die, quickly Save-Quit-Continue before you rematerialize. Either way you are going to have to start the level over. If you S-Q-C, you save the rematerialization fee while the only disadvantage is that you lose any good loot that you hadn't picked up yet. But not that much good loot drops anyway. If you see eridium or purple weapons, make a special effort to pick them up as soon as you can.
If you have been playing the slots and upgrading your ammo carrying capacity, you should have no trouble; otherwise, you may run out of some ammo, mainly in the last round. This is why it is good to max out your carrying capacity for sniper and launcher ammo. Even then, you have to be very careful about how you use your rockets, and on later rounds you may run out of sniper ammo if you stay back in your shipping container to snipe at bots on the far ledges. A relic that boosts sniper ammo carrying capacity would help
You can get virtually unlimited rockets with the combination of The Sham shield (farmed from Bunker), a Kerblaster rifle (farmed from Midge-Mong at Symbiosis), and rifle ammo to spare. When you run low on rockets, change into The Sham and fire the Kerblaster at your feet. You get one rocket (up to your max rocket capacity) each shot taken with the Kerblaster.
A level 20+ Caustic Infinity pistol is a good weapon to have here since it never runs out of ammo and the corrosion kills robots, even from a great distance. A pistol damage relic (e.g.: +19% damage) and Elemental Damage mod would help.
Also helpful are mods and relics for increasing damage for launchers, rifles, etc., and for decreasing cooldown times. There is a relic to increase sniper ammo carrying capacity by over 40%. With already maxed-out capacity, this increases it from 132 to 189 rounds. Since the sniper rifle is usually the most useful and the first to run out of ammo, this relic is great.
It's also good to be able to carry 9 or so grenades. A high-damage (e.g.: 2400x7) corrosive homing grenade like the legendary Homing Pandemic is great for general use as it can kill enemies from any distance which you can't even see. A transfusion grenade for when health is handy if you don't have great weapons and shields.
Hyperion Slaughter Vault Symbol is on the bottom of the elevator floor. Raise the elevator, push the button to bring it back down, go underneath it and "discover" the symbol. You'll get crushed, but you can Save-Quit-Continue to escape the rematerialization fee.
Turret 2: When done with Hyperion Slaughter, your car will be gone. Run down the hill and to the right to find a nearby C-A-R. Just before you get to it you'll see a structure on your right. Go towards it until a turret gun pops out. A couple of bots will also appear.
Comms 3 & 4: When you have finished them off, look back the way you came up to the structure to see the last two comm dishes in the distance.
Turret 3: Continue down the road to the bridge and turret 3.
Turret 4: Turn left at the bridge and go to the tower on the right. A turret will appear.
Fuse Box 2: If you keep driving, the road runs into another road. To the right is a platform with Mailbox 4 for when you do Customer Service and with a ladder down to another platform crammed with bots and a room with an electrical shield. The fuse box is easy to find and releases more bots.
Go back to your car and you can turn left to go back to the road, or follow the path as far as you can to reach a couple of safes and temporarily clear the area of bullymongs which may be handy when you come back to do the Customer Service mission, although it is not absolutely necessary to do so.
Get back to the road and go back through gate G1. If you shot the fuse box, you can drive across the road to the right of the barricades and follow the path around to the right. If the electric barrier is still there, go back and shoot the green light near the top of the other side of the gate tower.
Otherwise, you can jump down where the ladder is and kill some really nasty bullymongs (or die trying). This is a purely optional exercise - not even any challenge points and no great loot.
Turret 5: Continue down the road a little way to a tower on the left with a turret gun.
Symbol 2: Cross the bridge then bear left and then right. Clear the camp of bandits. Cross the next bridge and park. Take the pedestrian bridge towards the ladder. Half way there on the left is a vault symbol.
Kill Yourself: Climb the ladder, pick up loot, and jump. Don't push the "counselling" button if you are going to kill yourself. You may hate to give Jack the satisfaction, but that's a lot of eridium to pass up if you don't. If you Save-Quit-Continue after you die but before you rematerialize, you can save the rematerialization fee, but if you don't care about the money, you get the benefit of rematerializing right where you left your car parked.
Real Boy: Continue over the next bridge, turn right and park. Clear the area of bandits and pick up stuff for the mission. Be sure to go up the ladder to the cabin on the platform and clear it for the Customer Service mission.
Cross the next bridge and take the first left into a small town. Clear it for the Customer Service mission. Drive off the end and land near the bridge.
Customer Service:
- Go back to the first camp you cleared after crossing the bridge. It should still be clear. If not, clear it again then go to the mail box. This starts the timer.
- Go back to where you parked for the Real Boy mission. Go in the entry and up the ladder to the right to get to the mail box. If you've been following these steps, this area should still be clear.
- Go to the next town you cleared and go to the mail box in the middle of town, then drive off the platform at the end of town to land by the bridge as you did before. Go across the bridge and immediately turn left and go straight down under the pipeline.
- Follow your HUD to the next nearby mail box; come back out and go left and back up to the road near the closed bridge.
- Mailbox 5 & Symbol 3: Follow the road and look to the right for a Hyperion compound just before you get back to G1 on the map. It wasn't worth trying to clear this area in advance because you can now drive down near the door, go in and run all the way to the back left side of the building for the vault symbol. Run back to the mail box marker shown on your HUD then get the heck out of there. A turret or robot is handy, but you should be able to get in and out okay without one.
This completes the mission.
A Real Boy:
Turn in that mission and pick up the next one (Face Time).
Do the Face Time mission and continue to Grandmother's House...
To Grandmother's House:
This is just past the town that you cleared and drove off the edge. Complete the missions then drive off the cliff to come down across the road from the fast travel machine or you can just Save-Quit-Continue.
Pipe Dreaming:
From the fast travel station, go down the road, across the bridge, but instead of bearing left as before, turn right to get to the base of a pipeline support. Get on the other side and do a running jump to the right side of horizontal pipe-looking thing, then jump onto a small ledge, then onto the pipe, then onto the level with a dumpster. Open it and jump on the edge of its lid and then up to the next level. Circle around to the pipeline.
If you haven't already cleared the area of bullymongs, they may jump onto the pipe or throw boulders and knock you off. Donkey Mong may even show up here. So watch for red dots on your HUD and have a weapon ready to kill them if they join you.
Once things are clear, run along the pipe until you get to a break in it and jump to the next section. Don't try to time it to the last second; try jumping just before the very end. The next section has a chest. Mission accomplished and you can Save-Quit-Continue from there.
Save the Turrets: This challenge comes later as part of the main mission where you are protecting Claptrap as he tries to hack the gates.
Vault Hunter vs the Volcano: This challenge is a pain and doesn't have much of a payoff. Here's a video if you really want to do it.
Return to top.
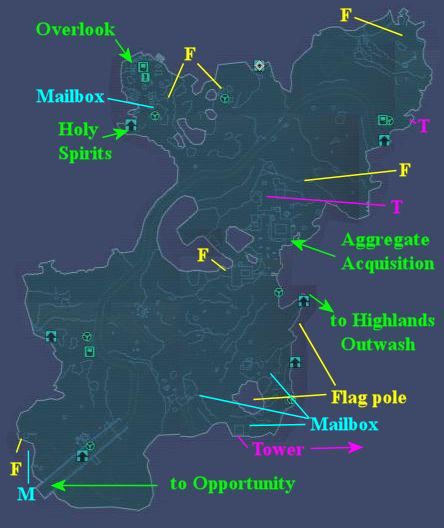
Missions: Chosen One, Capture The Flag, Toil & Trouble, The Great Escape, The Lost Treasure.
Challenges: Vault Symbols (2), Happy Camper, Race to the Top, Haiku Hitman (4 echos).
This opening area and the bandit town which is the top right area are famous for loot box midgets who drop legendaries. I got a level 27 legendary Frakker from the washing machine next to the vending machines in the opening area while preparing this page.
You can farm this area by checking the washing machine, then dropping down to the large area below and checking all its chests. You can Save-Quit-Continue until you are satisfied. There are other ways to farm it, but all of them are time-consuming and don't pay off as often as at Wildlife Exploration Preserve, so I'm not getting into it here. You can check YouTube for videos.

The area in the center of the above map has a vault symbol and echo, but they are located on the top of that area ("Mortar's area"). You need to use an elevator to get to them.
Echo 1: As you head through town, you will spot the first echo in a big opening on your right. Continue past it to the edge if you would like to snipe at a few bandits down below. Take a look to your left to see a lower platform with two ammo boxes on it and a ladder back up. Directly below where the horns stick out is the entry to the cavern where the main mission will take you. This is a shortcut for times you don't want to go through the bandit areas, such as for Race To The Top or when farming Mortar.
Chosen One: Go to the end of town to pick up Kai's first echo.
Capture The Flag 1: Continue to the platform overlooking the top left part of the map above. Jump down and clear the area of threshers and bandits, then go to the flag pole and raise the flag.
Echo 2: Pick up the echo from the last camp area before the stairs and short tunnel to the next area at the top-right map.
The Lost Treasure: While circling this area you will see some stairs going up the side of a hill where you will find this mission. You get clues by killing random bandits, so it's better to pick up this mission before clearing this area of bandits, but even so, you may not get all the clues in this area alone, in which case you need to keep an eye out for the blue mission markers wherever you kill bandits. After getting the four clues, the mission finishes in Caustic Caverns.
Capture The Flag 2: Take your time to explore this area's large number of chests and bandits. After killing the local citizens, follow the HUD marker to a spot to raise and defend a flag.
Toil & Trouble: Follow the mission marker into the cavern. Note the stairs up on your left which is where you will go when the elevator doesn't work. You can either bear left or right to circle around to the mission point. Whichever way you go, try to remember the route for when you do the Race To The Top or when farming. When done killing bandits after pushing the elevator button, circle back around to the stairs you just noted to get to the next area which is the large lower right section of the map.
Chosen One: When you come out to the lower right area with the threshers, you will see a HUD map marker to the left and one to the right. To complete the sub-missions, you have to save the one to the left for last, so follow your HUD map to the right marker, then turn around and go back to the other marker, which is at Kai's body. This completes the mission.
Capture The Flag 3: Follow the marker on your HUD to the nearby flag pole.
Toil & Trouble: is the active mission now.
Tannis Riding A Fish: (Easter egg.) You are at the bottom right of the map above. Shoot the barrels by the water in this order: Blue shock barrel, Red incendiary barrel, Green corrosive barrel which is on its side on a small bit of land out in the water, Yellow explosive barrel behind a fence near the flag pole, and the Purple slag barrel. (Mnemonic: "Be Ready. Get Your Pie.")
Symbol 1: Following the main mission again you will get to the area which has the vault symbol indicated on the map above. It is on the inside wall of the shipping container. After getting it, go back and up the stairs as indicated on your HUD map.
Echo 3: After clearing the area, go push the button and destroy the buzzard (aircraft). Turn around and go to the stairs on the right of the building. Go up the stairs, up the ladder to find the echo. For more loot, jump to the round structure and then to the next roof (which looks too far but isn't). Go to the far left corner and jump down to the roof with barb wire around it.
Echo 4: Before starting down, climb on a junk pile to get on a pipe that goes to an outhouse for some loot. Then head back down to the elevator by following your HUD map. After killing Mortar (a launcher is nice), go up the elevator. After clearing the area, start marking the crates in front of the elevator and circle counterclockwise from there. Behind one of the buildings you will find an echo.
The Great Escape: If you are still circling counterclockwise, behind the last building you will find a goliath with this mission. Alternatively, facing the elevator it is the building to your far left.
Symbol 2: Go in the elevator, push the button and quickly back out, then jump on top and face right. When you see a loot chest, jump on top of it. Loot it and face the inside of the elevator shaft. A couple of floors down you will see an area with a clearing. Jump to that girder and the vault symbol is on your right. Or try this: send the elevator down without you, then push the button to bring it back up, then immediately jump down to the right side of it and watch for the chest. Jumping off on the way up gives you more time but you may miss the elevator.
The Great Escape: Jump down to the top of the elevator and follow HUD markers. When done, you will be back on top again. Send the elevator back down for later use, then go to what should be a round blank area on your HUD map.
Race to the Top: Save and quit, then continue. The timer starts as soon as you materialize, so immediately run to to the opening in the rocks to the left of the vending machine. Jump down near the entry to the cavern (where the horns stick out) and go inside. Take the left or right route to the elevator - whichever you are more familiar with. Keep running past all the bandits firing at you. Go up the elevator and out to the top. Done. Very easy.
Happy Camper: Coming out of the elevator turn left and go as far as you can. In the corner where there is a break in the rails, look down to see the camp site including a car trunk weapons chest. Jump down to complete the challenge.
Mortar can drop a legendary Pandemic grenade mod. This is one of the best weapons in the Normal mode game, so you should definitely farm him for it.
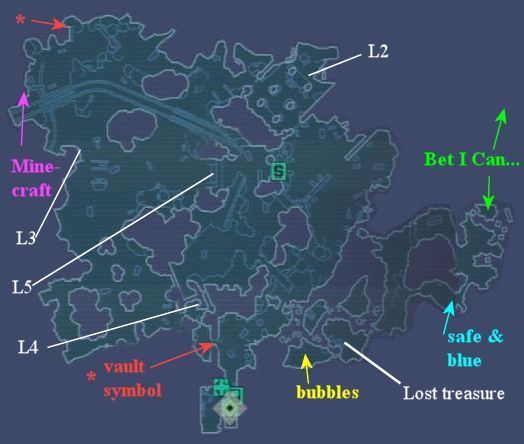
The Lost Treasure: You should have easily gotten all the clues by killing bandits. Go to Caustic Caverns to complete the mission. You may need to refer to the Caustic Caverns map further up the page to be able to follow the "clues".
Each clue leads to a switch you must throw, then finally to a loot chest. All the videos for this quest are confusing because the player has to run around in circles fighting off crystalisks and threshers, which you'll be doing too. This is why you will need to get your bearings using the CC map above. You can run by critters going from one point to the next, but when you get to a switch, you'll probably have to stop and fight a few.
- Use the directions under the CC map to get to the point marked bubbles and continue those directions until you reach the first switch which is on the side of a pillar. The first pillar you come to is actually a pair of pillars. The next pillar beyond these is the one you want.
- The second switch is on the outer wall of the Infested Warehouse. When you go in the door, turn right out the side door, flip the switch, come back in the next side door and out the top door.
- Go past the structure with the loot chests and through the tunnel to the right. Go under the overpass and the switch is on the left.
- You'll see some big round nests ahead. Run through those and get to the door leading into L4. Bear left and the switch is on the wall.
- Go back the way you came until you can circle around to the L5 point. This is a large open-air elevator.
Go up and continue to the upward path on the right.
Continue until you get to an area with a big switch sticking up in the center. It brings up the loot.
Return to top.
Arid Nexus - Boneyard
Missions: Data Mining, This Just In, Monster Mash.
Challenges: Vault Symbols (2), Under Pressure, Dead Air.
Monster Mash: Dr. Zed gives the Monster Mash mission parts and while the fast travel machine will highlight locations to go for each part, only part 3 missions have to be done at particular spots. The 1st part is to kill spiderants. The 2nd part is to kill rakks and skags. 3rd is to kill 20 Skrakks which are located only in Arid Nexus Boneyard, then go to Frostburn Canyon and kill the Abomination ("Spycho"). After you turn in part 3, you can come back and farm Spycho for the legendary Neogenator shield.
When you go back to Sanctuary to turn in MM2 and pick up MM3, you should be able to get the This Just In mission if you don't already have it.
This Just In & Dead Air: The mission is to kill the guy. The Dead Air challenge is to turn off the radio on his back before you kill him. This can be tricky when you kill him for the mission, but you should be farming him for the Bee shield, in which case you can easily open the door, walk up behind him, turn off the radio, and kill him.
Before farming him go back to Sanctuary and turn in the mission.
If you do not get this mission before doing the Data Mining mission, be sure to get it BEFORE turning in Data Mining or you will be blocked from doing this mission until after you have killed Jack. When you farm the radio guy, he will eventually drop a Bee Shield which is one of the best pieces of gear you can get.
Data Mining: Go up the ramp to the ladder to the pipeline.
Monster Mash 3, part 1: Go to the map marker and kill the skrakks. Part 2, killing the abomination, comes later.
Symbol 1: Go all the way south. Symbol is on the side of the turret tower.
Data Mining: Go to the buildings on the other side of the pipeline and turn the wheels.
Symbol 2: Drive up the ramp leading to the top of the pipeline and turn right. Go as far as you can to find the symbol.
Under Pressure: Go north towards the two beams of light going up in the sky. On the C-A-R is a button to press to bring down a constructor and other bots. Kill them all.
Data Mining: Do the rest of the mission up to going to the Badlands.
Arid Nexus - Badlands
Missions: Data Mining, Get To Know Jack, Uncle Teddy, Hungry Like The Skag.
Challenges: Hey! Over Here, Boned, The Beginning of the End (5 echos).
Hungry Like The Skag: This mission drops when you kill skags. You can complete it by killing more skags as you do the steps below.
Go to the entry to what used to be Fyrestone and go to the mission board to pick up Get To Know Jack and Uncle Teddy.
Echo 1: Go across the street to the old C-A-R station to get an echo.
Echo 2: Continue back to Baha's old house. The echo is in the outhouse.
Uncle Teddy: Go into Baha's old house, pull the fan chain, go down into the basement, and complete the mission. To turn the mission over to the evil corporation, go back to the mail box by the fast travel machine; otherwise, hold it until you get back to the mission board and use the mailbox next to it to turn the mission to Una.
If you pick Una, you will get the Lady Fist pistol. It is not a legendary weapon; all you have to do to get it is to turn the mission in to Una, but it has +800% critical hit damage and other improvements.
Boned: Keep circling around clockwise looking for skags to kill and eventually come to Bone's old camp. Kill Bone 2.0. In the shack with a chest by it there is a Get to Know Jack echo inside.
Hey! Over Here: Back in Fyrestone, go to the building on the left with the ammo vending machine. Climb up the rocks around the right side and continue up to find the old Claptrap and a loot chest.
Fuse Box: Go right of the electrified room. Climb up on the roof and move as far to the right as you can. Look north for a structure in the air on two supports with a fuse box sticking up on the left side. You should be able to just see it sparking. It may take a few shots to hit it.
Echo 3: Go inside the room to find the echo.
Echo 4: Across from the room is a building with a ramp on the right. Go up the ramp to the roof to get the echo.
Echo 5: In a dumpster next to the building where you fight the giant bot (named Saturn).
Data Mining: This building is a good place from which to fight Saturn. You can keep it between you and the bot, and the shed provides protection from its rockets. Saturn can drop either of two legendary items: Invader or Hive.
After you destroy Saturn, complete the mission, after which constructors will appear at each end of the building. If you have a bot or turret, you can deploy it at one end to fight that constructor, then run to the other end to destroy that one. Don't miss the ladder on that level to get to a loot chest. When done, jump down to the ground and go back to the small building where the last echo was.
Get To Know Jack 2: On the roof of the building is a loot chest and an echo for the mission. Go up its stairs, jump onto the railing, onto the shed and onto the far right edge of the roof. The rest of the Jack echos are in Arid: Boneyard.
After you go through the portal back to Arid: Boneyard, turn right and fight your way over to the C-A-R. Looking out from the C-A-R you'll see a tall windmill with a small structure to its left. The next Jack echo is in the rakk nest on the top of the windmill.
To get the echo, flip the switch on the side of the small structure. This rousts the rakks, one of which will have the echo. Shoot him to get the echo. It may fly up into an area to the right of the portal to Arid: Badlands. To get back up there, you'll have to go where you broke the pipeline and go in it like you did before.
The other Jack echos are comparatively simple to get to, but you'll want to get a car first. While there, you can flip the switch to bring out the constructor and badasses if you want to have a little fun.
After you get the last two Jack echos, go back to Arid: Badlands bounty board to turn them in.
Monster Mash 3: Kill Dr. Zed's Abomination:
Go to Frostburn Canyon and do this mission.
The map marker is confusing, so follow the steps under Return To Frostburn Canyon further up this page.
Return to top.
Challenges: When Nature Calls (3 toilets), Environmental Protection (3 terminals), Vault Symbols (2)
Here's a video for just the challenges. For a video of The Talon Of God mission, use the link above.
Symbol 1: To the right of the vending machines.
Toilet 1: Across from the vending machines.
Terminal 1: On a raised platform on the left before you get to Brick, which is well past where you have to jump over the bridge with the gap in it. It will be the first time that Brick actually stops and waits for you. You don't have to get up to it, just shoot it.
Toilet 2: Below and facing the terminal.
Terminal 2: At the start of the low bridge with the big battle with Brick vs. bots.
Terminal 3: Turn right at the end of the bridge and go as far as you can into the point of land on the map.
Fight your way to the scene of a big battle with badass bots and Hyperion soldiers. Once those guys are dead, you can get on the bridge where the soldiers came out and snipe at the constructor in the distance. Its rockets cannot reach you. If you run out of sniper ammo, even pistol ammo will eventually kill it without your getting hit.
Symbol 2: Go down the stairs on the left side of the bridge, make a u-turn to the right of the stairs, jump to the first bridge support and then the second one.
Toilet 3: On the second level above the ground at the end, it's behind you and facing you.
The End
There is a fast travel machine by the vending machines. If you go anywhere with it, you cannot come back to it. The closest you can come is the start of Hero's Pass and you have to fight (or run) your way through it again.
After you sell gear and buy ammo at the vending machines, drop down into the Jack/Warrior arena. Call this the "entry wall".
On your way out to meet Jack. you come to an ammo dispenser and shortly after that, the path has a ledge where you jump down to continue to Jack. You cannot jump directly back up to the top of the ledge, but there is a little piece sticking out to the right of the ledge which you can jump onto and then jump onto the ledge. (You can run around the ledge, but this is faster.)
You can kill the Warrior however you prefer, but here is a less stressful method:
After the Jacks come out, you do not have to chase them. Go back and get to the top of the ledge just mentioned. The Jacks will come after you. This puts you closer to the safety of the entry wall after killing him (not that getting back there is really a problem). If you have a robot, you can deploy that when Jack comes out, go back to the wall, and wait for the robot to kill him. If you have a homing grenade, you can toss it out to help the robot.
After Jack sics the Warrior on you, go back to the entry wall. The Warrior cannot do anything to you there (on rare occasion he may throw something and do minimal damage) and you can shoot him with whatever you have for as long as it takes to kill him. Try to stay on one side or the other because in the middle you bring up the Exit option and if you press X (on the Xbox) thinking you are going to reload your weapon, instead you'll travel out to Eridium Blight and have to start Hero's Pass over to get back.
If you have relics or mods which increase the damage of your weapons, they will help speed things along. The Bee Shield really speeds things along because of the amp.
Do NOT shoot the rakks. They spawn infinitely, so you are just encouraging them to attack you. If you have deployed your bot, he will shoot rakks and they will attack him but not you. The bot/turret will not attack the Warrior all out, though it appears that the bot will shoot him with electric bolts now and then.
If you have followed this guide for getting eridium and maxing out your sniper and launcher ammo, you should have plenty of ammo. If you run out, you can always go out to the first ammo dispenser.
If you die in this area, do a Save-Quit-Continue before you rematerialize to save the fee. You gain nothing by letting it redo you and paying the fee because the Warrior's full health is restored when you go back. You have to get to the ledge past the first ammo dispenser to trigger spawning the Warrior. Then go back to the entry to fight. Again, a crystalisk sometimes comes out and needs to be taken care of.
After you have killed Jack and the Warrior, Jack's body sometimes covers the point you need to activate to proceed. If this happens, Save-Quit-Continue which should put you by the vending machines, then come back and Jack's body will be gone.
Do the activation to trigger the ending scene. When it is done, you can interrupt the credits, then press Save-Quit-Continue and you will be prompted to select which mode to play. If you want to farm the Warrior for tons of XP, eridium, and other loot, select Normal. You will materialize by the vending machines next to the Warrior's arena. If you do not select Normal, you can go back in Normal Mode later using the Fast Travel, but you will have to run through Hero's Pass again.
In the game played for the videos, I farmed the Warrior for a long time and never got a legendary, so I just gave up. I did get over 300 bars of eridium and leveled up twice while farming the Warrior, so it wasn't a total waste of time.
If you are a Mechromancer, Deathtrap will continue to kill the infinitely spawing rakks, which drop loot and give you level-up points, even after you kill the Warrior, while you run around picking up loot. This requires the skill tree item which adds 5 seconds to the bot's duration every time you or it kills something.
If you decide to go to lunch while Deathtrap is racking up level-ups for you, it won't work. Once you are gone, he quits killing rakks, but you can get him going again when you come back.
The End for Me Too
Having made it this far, the most fun for me is to start a new character to use (and improve) the armory. To use this character as an Armory Character, Save and quit to the BL2 menu, bring up the list of characters and choose this one and True Vault Hunter ("TVH") mode. This will start you back in the snow outside Claptrap's Place.
Once you get inside, go into the second room and activate the fast travel machine. You don't have to go anywhere, just get close enough to activate it. If you don't do this, then next time you use this character you will start back in the snow again.
Go back to the closet in the first room that has the vault symbol in it and you will now see a safe to the left of that closet and a Claptrap's Secret Stash locker inside the closet. Use this locker to pass all the gear from the current character to the Armory Characters.
If you don't have any ACs yet, the current character will be your first one.
For more information, see the Armory page.
Return to top.
True Vault Hunter Tips
After a dozen or so times of stopping after killing Jack the first time, I get an itch to play on in the True Vault Hunter mode ("TVH") instead of starting a new game. I did this in my most recent game and have some tips from that experience to pass along.
Things get tougher. Playing the first stage (up to killing Jack) over and over and starting each level with the strongest weapons available thanks to the armory, the game is pretty easy.
In the higher levels (above 32 or so) without the advantage of an armory with lots of legendary weapons for every level, the game is a lot tougher. The most awesome legendary weapons, like Caustic Infinity pistol and Homing Pandemic grenade mod are not as lethal any more.
After leveling up a lot either by playing all or at least a lot of side missions or by fighting bosses over and over, once you start over in TVH, you are no longer several levels above the mission requirements, so you are fighting enemies who are more your equal.
In my most recent game, I started TVH at level 34 and was still there by the time I got to The Berg. My experience getting to The Berg taught me that all those side missions which I breezed through originally would be a lot tougher in TVH, so I didn't feel like doing all those side missions.
I would have liked to do Symbiosis to have a crack at a legendary Kerblaster, but the odds of getting one are small, the time and effort required to retry are large, and the upgraded enemies would have been awfully tough, so I skipped it.
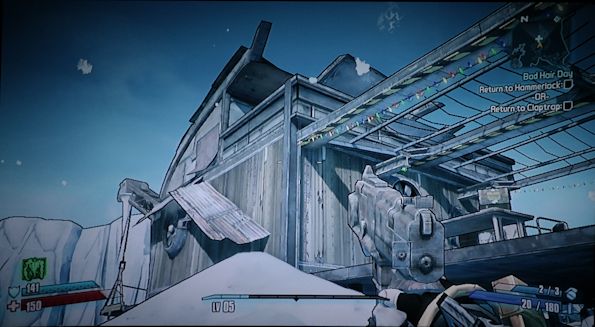
I didn't even do Bad Hair Day even though I would have liked a level 34 sniper rifle, but didn't think I could melee an upgraded Bullymong.
Best Minion Ever was rated at level 35 and I was 34.5, so I leveled up the same way I did the first time - killing rakks and the bandits in nearby camps from a distance and with the help of Deathtrap.
Having gotten to level 35, I grabbed Claptrap and started out for Boom-Bewm, hoping to get a level 35 legendary grenade mod and planning on retrying until I got one. After all, my main goal in playing TVH was to build up my armory for the higher levels.
After a tough battle, including getting killed once, I finally killed Boom-Bewm, but didn't get the legendary. I thought it was too hard to keep trying again and again, so I pushed on with the main mission with the intent of coming back later.
After getting to Sanctuary, I upgraded with the relatively few level 35+ weapons I had in the armory, picked up the missions, and took off.
I did the Bullymong missions, fixed the power in Three Horns Valley, killed Doc Mercy once and 25 bandits, and by then, I was at level 37 and decided to go back to Boom-Bewm and try for the grenade mod. I discovered that I could snipe Boom-Bewm from the bandit camp next door, then I released Deathtrap to clean up. In 2-3 tries, I had the legendary Homing Bonus Package.
Next was farming Doc Mercy, who can drop one of the great weapons in the game - an Infinity weapon which never has to be reloaded. It just spits out a steady stream of bullets, making it far more destructive than its damage rating.
This is an ideal level up and farming opportunity -- he is close to the respawn point with ammo machine. You just hop in a car, drive around to the cave opening, hop out, and toss a couple of Homing Bonus Package grenades at the bandits along with releasing Deathtrap.
When the bandits are all dead, watch for Doc Mercy to come out. Throwing 5-6 grenades at him is enough to do him in. I've also killed him from a distance with a powerful sniper rifle.
If no legendary drops, you Save-Quit-Continue and repeat until it does. Meanwhile, you are getting XP for all the killing and Doc sometimes drops eridium as well. It took about 4 tries to get a Burning Infinity.
I would have preferred a Caustic Infinity and went back later to try again, but after over 50 tries with no luck, I gave up. It only takes just under 2 minutes per try, but that's still an hour and forty minutes for 50 tries, and the longer you try, the fewer XP you get so leveling up would take even longer.
Even if I had gotten another Infinity, there's no guarantee that it would have been a Caustic. I'm happy to have at least gotten one.
Farming Bad Maw for eridium and to level up was not as productive in THV. It would take 20-30 kills to go up one level.
Return to top.
I've gone over this document pretty thoroughly, but given its scope, I would be surprised if there are NOT some errors in it. If you find some, please leave comments on the videos on Youtube.
Close this page if the main page is still open; otherwise, click here to open it.